Settings
General
Deformable Mesh
This is the Deformable Mesh (Asset) that you created using the Deformation Data Tool.

Hit Settings
- Collision Type Restriction (optional): Only deform when hitting components that have this collision type. By default there is no restriction.
- Actor Type Restriction (optional): Only deform when hitting an actor of this type. By default there is no restriction.
- Disable Hit: Disable new hits completely. (temporary?)
- Ignore Self Hits (V 2.1): Do not trigger a deformation when we are hit by ourselves. If activated the hit will be ignored as soon as possible. Useful when working with physics objects that are constraint to the actor. For example a physics door that may hit the vehicle. Used by Attachments.
- Receive Forwarded Hits (V 2.1): Can we receive forwarded hits from other Deformable Mesh Components? Used by Attachments.
- Generate Forwarded Hits (V 2.1): Forward hits to other Deformable Mesh Components when appropriate? Used by Attachments. Whether a hit should be forwarded to a specific Deformable Mesh Component or not is determined by the size of the impact sphere and whether the sphere is overlapping with another Deformable Mesh Component.
Deformation
Max Deform Percentage
Maximum deformation in percent. The exact value depends on the distance of the vertex to the deformation origin, e.g. a vertex that is far out can achieve a much higher deformation than a vertex that is located near the origin. Learn more about how the deformation works here.
Max Hit Deform Percentage
Maximum deformation in a single impact, e.g. 10%, means that at least 10 hits (10 x 10% = 100%) are required to achieve the Max Deform Percentage.
Max Hit Acceleration
Acceleration () required to achieve "Max Hit Deform Percentage". Can be measured with the debug setting Debug Vehicle Velocity.
Impact Registration Interval
Delay (in seconds) between the next hit that can be processed. With this setting, hits that follow each other too quickly are ignored (for performance reasons).
Min Relevant Impact Strength
Minimum Impact Strength (in percentage) required to trigger a deformation. You can create very slight visible deformation when using a very low value (or even 0) in combination with a scratch mask.
Deformation Falloff Curve
Defines how damage (per vertex) is distributed based on distance to the center (hit location). Adjust this curve to control how the deformation effect decreases over distance. For example, a higher Y-value at the start results in more severe damage close to the impact point.
- X-Axis: Normalized distance to the impact point, small values = close to center. Value range:
- Y-Axis: Amount of deformation. Value range:
Radius
Minimum / Maximum Impact Radius (in cm). It affects how many vertices can move (deform) in a single impact. The minimum size corresponds to a very low force impact and the maximum size corresponds to a very high force impact. You can visualize this using the Debug Impact setting.
Protection - Groups (V 2.1)
This is an optional setting. You can protect a predefined zone (box) from deformation with protection boxes. By default only ProtectionBoxComponents that are direct children of the Deformable Mesh Component are taken into account. With this setting you can additionally take ProtectionBoxComponents into account, that are somewhere else in the component hierarchy. The groups are also defined inside the ProtectionBoxComponents. For more information see Protection Box.
None Physics - Mass Override
This value (in kg) overrides the mass of the parent component (skeletal or static mesh) that is used to calculate the deformation. This setting is mandatory if none of the parent components simulate physics. This setting ONLY affects the deformation calculation! The actual mass is NOT changed.
Even components that are configured to not simulate physics may simulate physics when being attached to a component that does simulate physics! When being attached to physics simulating components, the above setting is optional.
NoiseEffects
- NoiseFactor: This controls the frequency scaling of the noise layers. It determines how "dense" or "spread out" the noise effect is on the deformation. Higher values result in more rapid fluctuations in the noise (creating a finer noise pattern), while lower values create smoother, less detailed noise effects. Recommended value range:
- TotalAmplitude: This controls the intensity of the noise effect on the deformation. It acts as a global multiplier that affects how strongly each noise layer (Noise1, Noise2, Noise3) contributes to the overall deformation. Higher values increase the deformation effect caused by noise, while lower values reduce it, giving you control over the strength of the noise-based deformation.
Advanced / Miscellaneous
Ignore Actor Component Origins (V 2.1)
Ignore any Deformation Origin Component of type Actor. Make sure to use FindOriginComponent and set the OriginComponent property of your Deformable Mesh Components manually after changing this at runtime!
Sound
Impact Sound (DEPRECATED V 2.1)
Deprecated, see Impact Effects instead.
- Play Sound on Impact: Should the Impact Sound play on impact?
- Impact Sound: Here you can insert a sound file that will be played on impact (when enabled)
- Impact Sound Attenuation: Insert a sound attenuation config file here that matches your impact sound.
Networking
Max Hit History
Maximum number of hits that are replicated. Additional hits overwrite the oldest hits. Limited by unreal networking. See Replication for more information.
Material
Material Overrides
If specified, these Materials will be applied to the created Procedural-/Realtime Mesh instead of the materials of the original static mesh. This is useful if you e.g. want to use custom deformation materials but do not want to change the original static mesh. Make sure to supply as many materials as the original static mesh has. Previously known as "Vehicle Material(s)".
Use Random Car Color
This requires a compatible material that uses the vector param "CarColor" to colorize the mesh. The random color is also stored in the component's CarColor variable (which is replicated).
Debug
- Debug Impact: Debug the impact from a hit. Draws a sphere and prints a string.
- Debug Impulse: Debug the raw impulse from the hit (acceleration [m/s²], force [kN], impact strength [%]). Prints a string.
- Debug Vehicle Velocity: Prints the current velocity () in short intervals.
- Debug Networking: Prints a string when an actor gets relevant and when a client is replicating hits.
- Debug Tasks: Debug background tasks in log (LogCategory: LogDeformableTask).
- Debug Forwarded Hits (V 2.1): Debug forwarded hits (that this component received).
The debug settings have a negative impact on the performance. Do not keep them activated unless you need them.
Performance
All "... LOD ..." settings only affect the Realtime Mesh Component and have no effect when using the default Procedural Mesh Component.
Initialization
Show parent while initializing: If this is activated the parent component (skeletal- or static mesh) will be visible while we load and prepare data (if needed!) and will be hidden when the deformable mesh is ready. This should NOT be activated when you are using a placeholder skeletal- or static mesh, because that placeholder may be visible for a small period of time when spawning the actor! This setting only makes sense when the parent component looks exactly like the deformable mesh.
LODs in background: Initialize LODs in background thread? This results in less actual in game stutters when a Deformable Mesh Component initializes, but the actual deformable mesh may not be visible instantly. You can use the above setting "Show parent while initializing" to counteract this. First LOD always has high background priority.
LOD 0 in foreground: Force the LOD 0 initialization in GameThread (synchronous). This will probably generate a lag spike (depending on the mesh), but the mesh will be visible "earlier". This is unnecessary and can be deactivated if "Show parent while initializing" is activated and if you do not use a placeholder skeletal / static mesh. Otherwise this should be activated if "nothing is visible" at startup. Disable this when you have performance issues on startup (when the deformable mesh component initializes).
Hit-Processing
LODs in background: Process the hits (for each LOD) in a background thread. This relieves the game thread, because heavy calculation is performed in background threads. First LOD always has high background priority.
LOD 0 in foreground: This forces the hit on LOD 0 to be processed on the GameThread (synchronous). This will probably generate a lag spike (depending on the mesh), but the deformation may be visible "earlier". Disable this when you have performance issues. You probably don't want to have this active in most cases.
Profiling
- Profile Initialization: Profile the initialization (LogCategory: LogStats)
- Profile Data Preparation: Profile the preparation of data (LogCategory: LogStats)
- Profile Hit Process: Profile the hit processing (LogCategory: LogStats)
- Also see: Performance-Profiling
Advanced
Mesh draw type (RMC): (ONLY RMC) The rendering path to use. Static has lower overhead but requires a proxy recreation on change for all components. Dynamic has slightly higher overhead but allows for more efficient updates. See official documentation.
Use Parent Bounds: Should the created Mesh Component use the bounds of its parent component? This potentially saves a lot of performance (at least for RMC)! If you have problems with culling / flickering / shadows: Try turning this off.
Bounds are NOT collision!
Experimental
Collision Damping
Dampens the force that throws the vehicle back like a rubber ball after an impact. Alternatively you can also use Physical Material Restitution of your Physical Materials. Our implementation can be customized using the Restitution Coefficient setting.
Impact Particles (DEPRECATED V 2.1)
Deprecated, see Impact Effects instead. When Impact Particle On Impact is activated the specified Impact Niagara Particle system is spawned on every impact (hit) at the hit location. See our example niagara particle system for reference.
Hazard Lights
Hazard lights are not included in the component itself anymore. The logic is very specific and that's why we moved it to the example car blueprint.
When Hazard Lights On Impact is activated, the hazard lights are activated for the deformable mesh on impact. This requires a compatible material that makes use of the IndicatorStatus and HazardStatus material parameters to display the status. Take our example deformation material M_Deformable_TestVehicle for reference. You can read more about materials here.
IndicatorStatus: 1 = Hazard (0 and 2 could be left/right indicators, but they are not relevant for this use case)HazardStatus: 0 = Hazard lights OFF, 1 = Hazard lights ON
Min Velocity For Hit (V 2.1)
This is the minimum velocity () that's required to trigger a deformation. 0 disables this check. If both the velocity of this actor and the velocity of the hit actor are lower than this, no deformation is triggered. The velocity can be measured with the debug setting Debug Vehicle Velocity. This is an attempt to prevent the deformation
from "eating into the mesh" when e.g. driving continuously against an object.
Impact Effects (V 2.1)
This setting can be used to play a sound (SFX) and/or to spawn one or more niagara particle systems (VFX) on impact. You don't have to select a sound and a particle system - if you don't want to play a sound or spawn a particle system then just leave the properties empty or remove the whole impact effect.
An impact effect with CheckPhysicalMaterial = False and CheckPhysicalSurfaceType = False (see image below) is used as the default impact effect, whenever no other impact effect was found for a physical material.
You can define multiple impact effects. They are evaluated on impact. We select an impact effect by comparing the physical material of the component that we hit with the specified physical material or physical surface type of the impact effect.
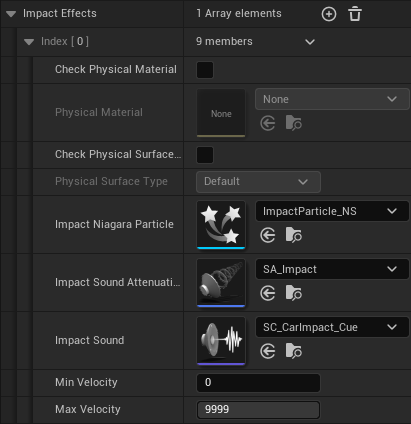
With the new parameters Min Impact Strength and Max Impact Strength, you can set the impact strength at which the effect should occur and when it should not. Note: An impact effect only triggers if deformation has also occurred.
- Min Impact Strength: This is the minimum impact strength (0 = small impact, Max Hit Deform Percentage = big impact) that's required to trigger this impact effect. It can be measured with the debug setting Debug Impulse.
- Max Impact Strength: The impact effect only triggers up to this impact strength (0 = small impact, Max Hit Deform Percentage = big impact). The velocity can be measured with the debug setting Debug Impulse.
Min Impact Strength and Max Impact Strength are new settings.