Attachments
This guide will teach you how to make deformable attachments like bumpers. For a simple guide see Chaos Vehicle.
An attachment is a separate part of the vehicle that is not part of the vehicle skeletal mesh itself. Good examples for attachments are front/rear bumpers or doors. Doors are often not part of the vehicle skeletal mesh itself, because they need to move (open/close) in some cases. An attachment can be welded to the vehicle (default) or attached to the vehicle using a physics constraint. We only cover welded attachments in this guide.
Requirements for Attachments
- You need a working chaos vehicle (we're not teaching you this).
- Every attachment must be available as a static mesh (to create a deformable mesh).
- Make sure you read the Setup for Chaos Vehicles.
You can still use separate skeletal bones in combination with animation blueprints e.g. for opening/closing vehicle doors (this can be done with chaos vehicles by default, see here), but the affected vehicle parts have to be separate (deformable/static) meshes! They can NOT be part of the vehicle skeletal mesh itself, because the vehicle skeletal mesh is only used for collision. The deformable car that you see in game is our Deformable Mesh Component and that component is not affected by moving skeletal bones. You'd have to create a separate static or deformable mesh component and attach that component to a skeletal bone (attachment method 2 in Setup).
Setup
- Make sure you have prepared all attachments that you want to make deformable. They'd be available as a static mesh (see Requirements). Here's an example for a police car from our
 demonstration video:
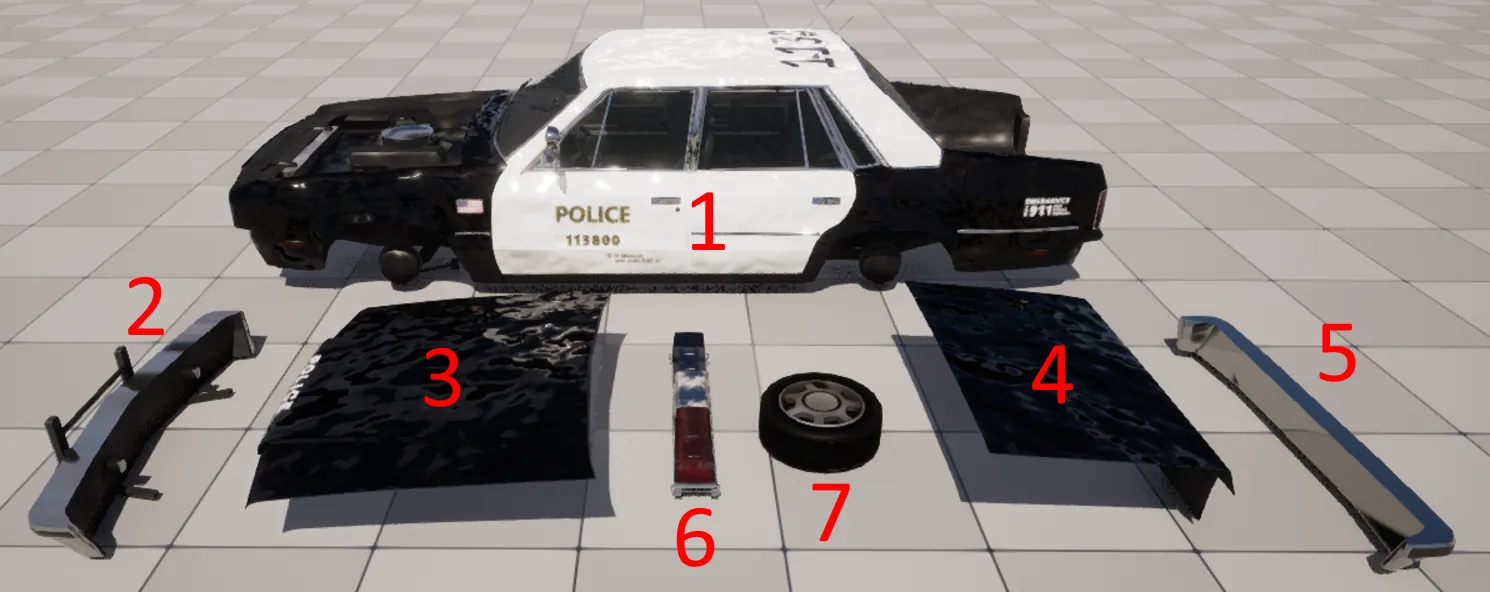
Example: Police Car Static Meshes
The Police Car from our video has some attachments. Both front and rear bumpers, the hood/trunk and the sirens are attachments that are connected to the car using physics constraints. The wheels are listed here, because they're static meshes. They do not deform.
- Create a Deformable Mesh for each attachment static mesh that should be deformable.
- Create a separate (static) mesh component for every attachment in your actor. Each mesh component must have collision enabled and
Simulation Generates Hit Eventsenabled (IMPORTANT).
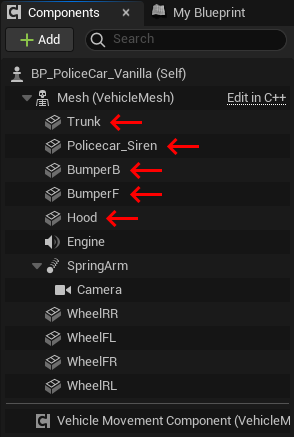
Example: Police Car Static Mesh Components
-
Choose one of the following attachment methods for the previously created attachment mesh components:
- Attach by welding (default): This is the simplest method of attaching a mesh component to your vehicle. You don't have to change anything after placing the mesh component somewhere below your vehicle skeletal mesh in the component hierarchy. Just make sure the property Auto Weld (Physics -> Advanced) is enabled (which it is by default), that's it. Physics simulation should be disabled when using this method (or method 2).
- Attach by welding to a skeletal bone / socket: This is like method 1, but instead of placing the mesh component "somewhere" below your vehicle skeletal mesh, you want to place it directly below the vehicle mesh and select the Parent Socket (these are the skeletal bones of the vehicle, see here) that you want to attach the attachment to. With this method the attachment will move / rotate when the socket / skeletal bone moves / rotates.
- Attach with physics constraints: You can of course also use physics constraints to attach an attachment to your vehicle. Since they're not known to be very stable in most unreal engine versions, we will skip this topic for now. If you want to go this road, make sure to take a look at the following settings of the Deformable Mesh Component: Ignore Self Hits, Receive / Generate Forwarded Hits.
-
Create a Deformable Mesh Component for each attachment mesh component that you want to deform and place the Deformable Mesh Component directly below the corresponding attachment mesh component in the component hierarchy.
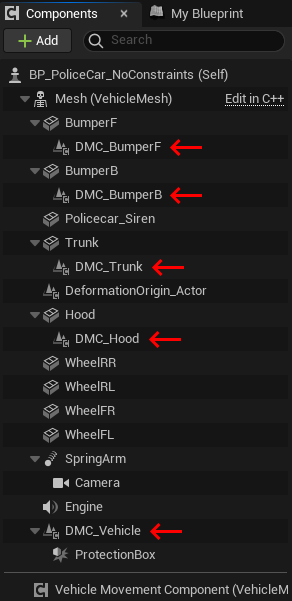
Example: Police Car Deformable Mesh Components
In this example we want to deform the bumpers (DMC_BumperF, DMC_BumperB), trunk (DMC_Trunk), hood (DMC_Hood) and the vehicle itself (DMC_Vehicle). The siren is not deformable, that's why there is no DMC_Siren.
- Configure each Deformable Mesh Component. At least assign the respective Deformable Mesh:

When using attachments, you probably don't want to deform every attachment completely different. At least not attachments that are close to each other (e.g. bumper and body). When you use very different deformation settings (e.g. Max Hit Deform Percentage 20% vs 40%) for e.g. the vehicle body and the bumper, the deformation may look off. A forwarded hit only forwards the hit location and hit strength. The receiving Deformable Mesh Component(s) then calculate their own deformation using their own settings with these inputs.
- Et voilà, you're done!
Optional Steps
Deformation Origin Component
This step mostly is only relevant for you when your meshes have a pivot which is not the pivot of the vehicle (when attached to a vehicle).
Since we always deform towards the origin / pivot of the respective mesh (explained here) you may want to use a Deformation Origin Component to ensure that the deformation looks the same (and goes into the same direction) for all Deformable Mesh Components. See the following example:
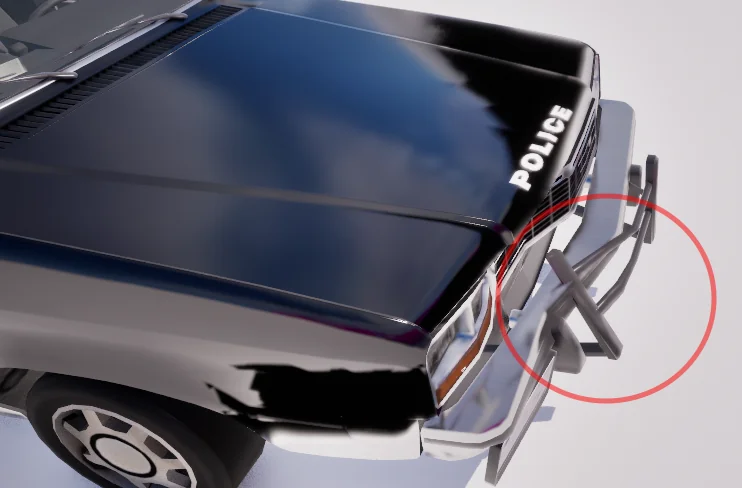
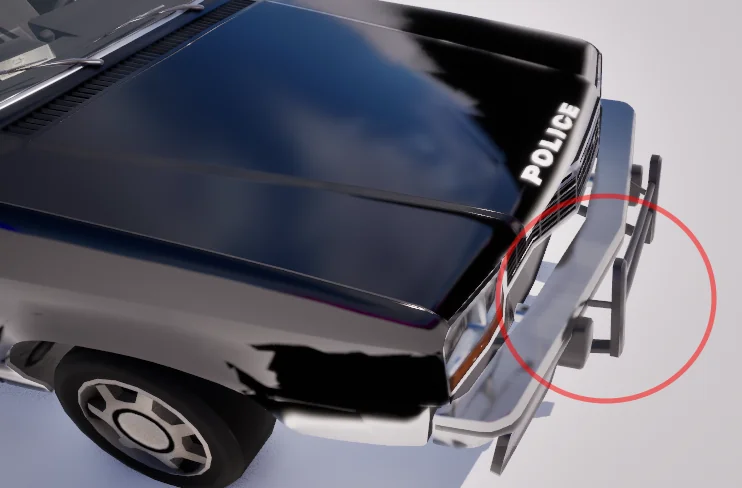
Example: Police Car Bumper
The settings used here are deliberately exaggerated for this demonstration. Both images show a similar deformation.
The first image demonstrates the default behavior without a custom deformation origin. IMPORTANT: The pivot of the bumper is NOT the center of the vehicle in this example, it's the center of the bumper! The red circle is the approximate impact sphere.
The second image demonstrates what the deformation would look like when the pivot (or deformation origin) of the bumper is the center of the vehicle (the mesh it's attached to). Way better!